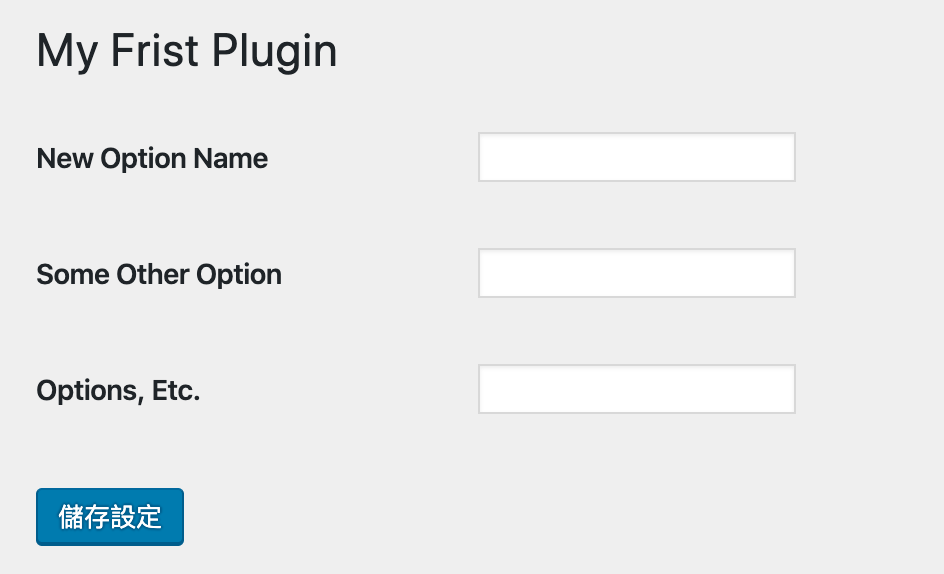
通常開發時會做的第一件事就是建立後台頁面
這邊先貼出完整檔案
詳細說明可以參考 https://codex.wordpress.org/Creating_Options_Pages
<?php
/**
 * Plugin Name:       My Frist Plugin
 * Plugin URI:        http://www.gocar.idv.tw/plugins/MyFristPlugin/
 * Description:       我的第一個Plugin
 * Version:           1.0
 * Author:            Henry Tsai
 * Author URI:        http://www.gocar.idv.tw/
*/

// 執行建立選單function
add_action('admin_menu', 'my_frist_plugin_create_menu');

function my_frist_plugin_create_menu() {
    // 加入左方選單
    add_menu_page('My Frist Plugin Settings', 'My Frist Plugin', 'administrator', __FILE__, 'my_frist_plugin_settings_page' , plugins_url('/images/icon.png', __FILE__) );

    // 執行欄位註冊function
    add_action( 'admin_init', 'register_my_frist_plugin_settings' );
}

function register_my_frist_plugin_settings() {
    //向 wordpress 註冊要儲存的欄位
    register_setting( 'my-frist-plugin-settings-group', 'new_option_name' );
    register_setting( 'my-frist-plugin-settings-group', 'some_other_option' );
    register_setting( 'my-frist-plugin-settings-group', 'option_etc' );
}

function my_frist_plugin_settings_page() {
?>
<div class="wrap">
<h1>My Frist Plugin</h1>

<form method="post" action="options.php">
    <?php settings_fields( 'my-frist-plugin-settings-group' ); ?>
    <?php do_settings_sections( 'my-frist-plugin-settings-group' ); ?>
    <table class="form-table">
        <tr valign="top">
        <th scope="row">New Option Name</th>
        <td><input type="text" name="new_option_name" value="<?php echo esc_attr( get_option('new_option_name') ); ?>" /></td>
        </tr>

        <tr valign="top">
        <th scope="row">Some Other Option</th>
        <td><input type="text" name="some_other_option" value="<?php echo esc_attr( get_option('some_other_option') ); ?>" /></td>
        </tr>

        <tr valign="top">
        <th scope="row">Options, Etc.</th>
        <td><input type="text" name="option_etc" value="<?php echo esc_attr( get_option('option_etc') ); ?>" /></td>
        </tr>
    </table>

    <?php submit_button(); ?>

</form>
</div>
<?php } ?>
這邊對程式內容用到的function做說明
add_action () 執行function
https://developer.wordpress.org/reference/functions/add_action/
add_action('admin_menu', 'my_frist_plugin_create_menu');
為什麼會用 add_action 來執行 function?
這跟WordPress的Hook機制有關,簡單來說,WP有很多程式區塊,想要讓function在特定區塊執行時就要透過Hook的方式執行
這段指的就是在 admin_menu 這個程式區塊執行 my_frist_plugin_create_menu 這個 function
add_action( 'admin_init', 'register_my_frist_plugin_settings' ); 也是類似原理,
主要是在admin_init時向WP註冊使用欄位
有機會會再對WP的Hook機制另闢文章說明,有興趣可以先google 會有很多相關說明
add_menu_page() 新增選單
https://developer.wordpress.org/reference/functions/add_menu_page/
add_menu_page('頁面標題', '選單顯示的名稱', '允許看到的權限',別名,產生頁面的Function,前面的icon圖);
頁面標題指的是後台頁面的<title>My Frist Plugin Settings</title>
icon尺寸則是要128x128
如果要子選單的話可以參考add_submenu_page():https://developer.wordpress.org/reference/functions/add_submenu_page/
建立設定參數
register_setting() 註冊設定參數
https://developer.wordpress.org/reference/functions/register_setting/
register_setting( '群組名稱', '欄位名稱' ); 一開始我們要先註冊要使用的欄位,所以建立了register_my_frist_plugin_settings() function 並在當中設定3個欄位function register_my_frist_plugin_settings() {register_setting( 'my-frist-plugin-settings-group', 'new_option_name' );register_setting( 'my-frist-plugin-settings-group', 'some_other_option' );register_setting( 'my-frist-plugin-settings-group', 'option_etc' );}
function my_frist_plugin_settings_page()
首先建立 my_frist_plugin_settings_page 這個 function來負責產生頁面
form 表單設定:
  <form method="post" action="options.php">
表單資料只要送給 options.php ,不用SQL語法 WP 就會自動幫我們處理資料
所以表單開頭要設定
settings_fields( '群組名稱' );
do_settings_sections( '群組名稱' );
這樣 options.php 才知道我們要處理的是哪個欄位群組

然後再建立 input 並透過 get_option('new_option_name') 取得欄位目前所儲存資料
<input type="text" name="new_option_name" value="<?php echo esc_attr( get_option('new_option_name') ); ?>" />
最後再加入 submit_button(); submit 按鈕
這樣就完成簡單的後台介面
