WP Plugin開發 (2)-Plugin 後台建立設定頁

通常開發時會做的第一件事就是建立後台頁面
這邊先貼出完整檔案
詳細說明可以參考 https://codex.wordpress.org/Creating_Options_Pages

<?php
/**
 * Plugin Name:       My Frist Plugin
 * Plugin URI:        http://www.gocar.idv.tw/plugins/MyFristPlugin/
 * Description:       我的第一個Plugin
 * Version:           1.0
 * Author:            Henry Tsai
 * Author URI:        http://www.gocar.idv.tw/
*/

// 執行建立選單function
add_action('admin_menu', 'my_frist_plugin_create_menu');

function my_frist_plugin_create_menu() {
    // 加入左方選單
    add_menu_page('My Frist Plugin Settings', 'My Frist Plugin', 'administrator', __FILE__, 'my_frist_plugin_settings_page' , plugins_url('/images/icon.png', __FILE__) );

    // 執行欄位註冊function
    add_action( 'admin_init', 'register_my_frist_plugin_settings' );
}

function register_my_frist_plugin_settings() {
    //向 wordpress 註冊要儲存的欄位
    register_setting( 'my-frist-plugin-settings-group', 'new_option_name' );
    register_setting( 'my-frist-plugin-settings-group', 'some_other_option' );
    register_setting( 'my-frist-plugin-settings-group', 'option_etc' );
}

function my_frist_plugin_settings_page() {
?>
<div class="wrap">
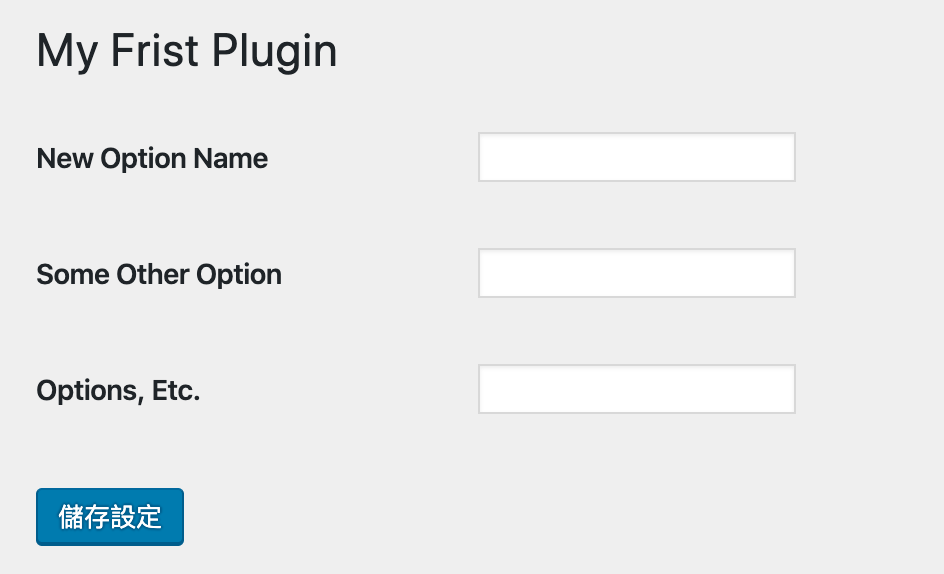
<h1>My Frist Plugin</h1>

<form method="post" action="options.php">
    <?php settings_fields( 'my-frist-plugin-settings-group' ); ?>
    <?php do_settings_sections( 'my-frist-plugin-settings-group' ); ?>
    <table class="form-table">
        <tr valign="top">
        <th scope="row">New Option Name</th>
        <td><input type="text" name="new_option_name" value="<?php echo esc_attr( get_option('new_option_name') ); ?>" /></td>
        </tr>

        <tr valign="top">
        <th scope="row">Some Other Option</th>
        <td><input type="text" name="some_other_option" value="<?php echo esc_attr( get_option('some_other_option') ); ?>" /></td>
        </tr>

        <tr valign="top">
        <th scope="row">Options, Etc.</th>
        <td><input type="text" name="option_etc" value="<?php echo esc_attr( get_option('option_etc') ); ?>" /></td>
        </tr>
    </table>

    <?php submit_button(); ?>

</form>
</div>
<?php } ?>

這邊對程式內容用到的function做說明

add_action () 執行function
https://developer.wordpress.org/reference/functions/add_action/

add_action('admin_menu', 'my_frist_plugin_create_menu');
為什麼會用 add_action 來執行 function?
這跟WordPress的Hook機制有關,簡單來說,WP有很多程式區塊,想要讓function在特定區塊執行時就要透過Hook的方式執行
這段指的就是在 admin_menu 這個程式區塊執行 my_frist_plugin_create_menu 這個 function
add_action( 'admin_init', 'register_my_frist_plugin_settings' ); 也是類似原理,
主要是在admin_init時向WP註冊使用欄位
有機會會再對WP的Hook機制另闢文章說明,有興趣可以先google 會有很多相關說明

add_menu_page() 新增選單
https://developer.wordpress.org/reference/functions/add_menu_page/

add_menu_page('頁面標題', '選單顯示的名稱', '允許看到的權限',別名,產生頁面的Function,前面的icon圖);
頁面標題指的是後台頁面的<title>My Frist Plugin Settings</title>
icon尺寸則是要128x128
如果要子選單的話可以參考add_submenu_page():https://developer.wordpress.org/reference/functions/add_submenu_page/

建立設定參數

register_setting() 註冊設定參數
https://developer.wordpress.org/reference/functions/register_setting/

register_setting( '群組名稱', '欄位名稱' );
一開始我們要先註冊要使用的欄位,所以建立了register_my_frist_plugin_settings() function 並在當中設定3個欄位 
function register_my_frist_plugin_settings() { 
  register_setting( 'my-frist-plugin-settings-group', 'new_option_name' );
  register_setting( 'my-frist-plugin-settings-group', 'some_other_option' );
  register_setting( 'my-frist-plugin-settings-group', 'option_etc' ); 
}
function my_frist_plugin_settings_page() 
首先建立 my_frist_plugin_settings_page 這個 function來負責產生頁面

form 表單設定:

  <form method="post" action="options.php">  
表單資料只要送給 options.php ,不用SQL語法 WP 就會自動幫我們處理資料
所以表單開頭要設定
settings_fields( '群組名稱' );
do_settings_sections( '群組名稱' ); 
這樣 options.php 才知道我們要處理的是哪個欄位群組

然後再建立 input 並透過 get_option('new_option_name') 取得欄位目前所儲存資料
<input type="text" name="new_option_name" value="<?php echo esc_attr( get_option('new_option_name') ); ?>" /> 
最後再加入 submit_button(); submit 按鈕 
這樣就完成簡單的後台介面

WP Plugin開發 (1)-Plugin 起始設定

文章參考:https://codex.wordpress.org/Writing_a_Plugin

檔案&目錄

建立Plugin第一件事就是命名,要取一個獨一無二的外掛名稱,不然跟別的名稱衝到就會發生慘案了
Plugin的資料夾是在 wp-content/plugins/ 
如果我的Plugin名稱為 MyFristPlugin
就在 wp-content/plugins/ 中建立一個資料夾 MyFristPlugin
然後在資料夾中建立一個 MyFristPlugin.php 的主程式

readme.txt

如果要把自己的plugin發布上傳到官網給大家下載,包裝檔案內一定要包含readme.txt

readme.txt 範本:https://wordpress.org/plugins/readme.txt

更改後可以透過驗證器檢查內容
https://wordpress.org/plugins/developers/readme-validator/

更多發布細節請參考:https://wordpress.org/plugins/developers/

MyFristPlugin.php 的檔案開頭一定要加上 File Headers 自我介紹
Header設定可以參考:https://developer.wordpress.org/plugins/plugin-basics/header-requirements/

<?php
/**
 * Plugin Name:       My Frist Plugin
 * Plugin URI:        http://www.gocar.idv.tw/plugins/MyFristPlugin/
 * Description:       我的第一個Plugin
 * Version:           1.0
 * Author:            Henry Tsai
 * Author URI:        http://www.gocar.idv.tw/
*/

?>

通常 Header 除了自我介紹外還會加入版權宣告
https://developer.wordpress.org/plugins/plugin-basics/including-a-software-license/

所以完整的Header就像這樣

/**
 Plugin Name:       My Frist Plugin
 Plugin URI:        http://www.gocar.idv.tw/plugins/MyFristPlugin/
 Description:       我的第一個Plugin
 Version:           1.0
 Author:            Henry Tsai
 Author URI:        http://www.gocar.idv.tw/

 {Plugin Name} is free software: you can redistribute it and/or modify
 it under the terms of the GNU General Public License as published by
 the Free Software Foundation, either version 2 of the License, or
 any later version.
  
 {Plugin Name} is distributed in the hope that it will be useful,
 but WITHOUT ANY WARRANTY; without even the implied warranty of
 MERCHANTABILITY or FITNESS FOR A PARTICULAR PURPOSE. See the
 GNU General Public License for more details.
   
 You should have received a copy of the GNU General Public License
 along with {Plugin Name}. If not, see {License URI}
*/

設定好後在已安裝的外掛清單中就可以看到剛儲存的外掛


環境配置:

一般plugin資料夾中我會建立下列目錄
同時會用 plugin_dir_path() & plugins_url() 來做路徑的設定

wp-content/plugins/MyFristPlugin
wp-content/plugins/MyFristPlugin/includes
wp-content/plugins/MyFristPlugin/js
wp-content/plugins/MyFristPlugin/css
wp-content/plugins/MyFristPlugin/images

利用 plugin_dir_path() 來 include 檔案:

define('MY_FRIST_PLUGIN_PATH', plugin_dir_path( __FILE__ )); // plugin所在目錄
define('MY_FRIST_PLUGIN_PATH_INCLUDES',MY_FRIST_PLUGIN_PATH.DIRECTORY_SEPARATOR.'includes'.DIRECTORY_SEPARATOR); // include 檔所在目錄

require_once MY_FRIST_PLUGIN_PATH_INCLUDES . 'function.php'; // 載入檔案

利用 plugins_url() 載入 js 檔或 css

<link rel='stylesheet' id='my-css' href='<?php echo plugins_url( '/css/my.css' , __FILE__ ); ?>'>' type='text/css' media='all' />
<script type='text/javascript' src='<?php echo  plugins_url( '/js/script.js' , __FILE__ ); ?>'></script>

基本的環境配置好了,下一步就開始製作程式囉

chart.js 圖表工具

chart.js是一個很容易操作的圖表工具,只要設定好參數,就可以在頁面呈現漂漂亮亮的圖表

先載入Chart.js
CDN : https://cdnjs.com/libraries/Chart.js

<script src="https://cdnjs.cloudflare.com/ajax/libs/Chart.js/2.8.0/Chart.bundle.js" integrity="undefined" crossorigin="anonymous"></script>

在要顯示圖表的位置加入 <canvas> 標籤

<canvas id="myChart1" ></canvas>

設定圖表

<script>
var ctx = document.getElementById('myChart1').getContext('2d');
var chart = new Chart(ctx, {
    type: 'bar',  // 圖表類別 bar:柱狀 line:曲線 pie:圓餅
    data: {
        labels: ['一月', '二月', '三月', '四月', '五月', '六月', '七月'], //X軸
        datasets: [{
            label: '資料1', // 資料名稱
            backgroundColor: 'rgb(255, 99, 132)', // 顏色
            borderColor: 'rgb(255, 99, 132)',     // 邊框顏色
            data: [1, 10, 5, 2, 20, 30, 45]       // 資料
        }]
    },

    options: {}
});
</script>

設定好就會出現圖表

如果要多筆資料:

var ctx2 = document.getElementById('myChart2').getContext('2d');
var chart = new Chart(ctx2, {
    type: 'bar',

    data: {
        labels: ['一月', '二月', '三月', '四月', '五月', '六月', '七月'],
        datasets: [{
            label: '資料1',
            borderWidth : 1,
            backgroundColor: 'rgb(255, 99, 132)',
            borderColor: 'rgb(245, 89, 122)',
            data: [10, 10, 5, 2, 20, 30, 45]
        },{
            label: '資料2',
            borderWidth : 1,
            backgroundColor: 'rgb(255, 199, 132)',
            borderColor: 'rgb(225, 169, 122)',
            data: [ 45,10,30,10, 5, 2, 20]
        }]
    },

    // Configuration options go here
    options: {}
});

調整大小

<div class="chart-container" style="position: relative; height:50%; width:50%" >
<canvas id="myChart1" ></canvas>
</div>

chart.js官網:https://www.chartjs.org/docs/latest/
各種圖表範本:https://www.chartjs.org/samples/latest/

Debian更改時區設定

切換到etc目錄

 # cd /etc

將原本localtime 更名為 localtime.o

 # mv localtime localtime.o

套用台北時區設定檔

 # ln -s /usr/share/zoneinfo/Asia/Taipei localtime

安裝校時軟體

 # apt-get install ntpdate

更新系統時間

 # ntpdate time.stdtime.gov.tw

確認時間是否正常

 # date
 Wed Nov 20 11:42:45 CST 2019

[PHP]日期時間轉換

取得今天日期

$today = date('Y-m-d');
echo $today.PHP_EOL;

取得今天日期 ( 時分秒 )

$now = date('Y-m-d H:i:s');
echo $now.PHP_EOL;

取得明天日期

$tomorrow = date('Y-m-d',strtotime('+1day'));
echo $tomorrow.PHP_EOL;

加1年1月1日後的日期

$someday= date('Y-m-d',strtotime('+1year +1month +1day'));
echo $someday.PHP_EOL;

也可以加年月日等計算

+1year:年
+1month:月
+1week:週
+1day:天
+1hour:小時
+1minute:分鐘
+1second:秒

特定時間計算

$date = "2019-01-01"; //特定時間
$newdate = date('Y-m-d',strtotime("$date +1month"));
echo $newdate.PHP_EOL;

Y-m-d 參數請參考PHP手冊:https://www.php.net/manual/en/function.date.php

[PHP]時區設定

台灣時區為+8小時,但PHP預設是+0小時
當現在now()應該取得時間為 18:00(GMT+8),但是輸出變成10:00(GMT+10)時
就是時區設定錯誤了,這時要記得修改時區

在PHP的設定檔 ( php.ini ) 找到時區設定

 [Date]
 ; Defines the default timezone used by the date functions
 ; http://php.net/date.timezone
 ;date.timezone = 

更改為(記得移除前面分號)

date.timezone = "Asia/Taipei"

儲存設定後重啟服務就可以了

[PHP]計算2個日期之間有幾天

物件( Object oriented style ):

<?php
$datetime1 = new DateTime('2019-01-01');
$datetime2 = new DateTime('2019-01-31');
$interval = $datetime1->diff($datetime2);
echo $interval->format('%R%a days');
?>

// +30 days

程序式 ( Procedural style ) :

<?php
$datetime1 = date_create('2019-01-01');
$datetime2 = date_create('2019-01-31');
$interval = date_diff($datetime1, $datetime2);
echo $interval->format('%R%a days');
?>
// +30 days

$interval->format 輸出格式說明:https://www.php.net/manual/en/dateinterval.format.php

透過迴圈來跑2個日期之間

$fristday = '2019-01-01';
$lastday = '2019-01-31';
$datetime1 = date_create($fristday);
$datetime2 = date_create($lastday);
$interval = date_diff($datetime1, $datetime2);
$godays = $interval->format('%a');
for ($i = 0; $i <= $godays; $i++) {
     $theday = date("Y-m-d",strtotime($fristday." +$i day")); 
     echo $theday.PHP_EOL;
 } 

輸出結果如下:

 2019-01-01
 2019-01-02
 2019-01-03
 2019-01-04
 2019-01-05
 2019-01-06
 2019-01-07
 2019-01-08
 2019-01-09
 2019-01-10
 2019-01-11
 2019-01-12
 2019-01-13
 2019-01-14
 2019-01-15
 2019-01-16
 2019-01-17
 2019-01-18
 2019-01-19
 2019-01-20
 2019-01-21
 2019-01-22
 2019-01-23
 2019-01-24
 2019-01-25
 2019-01-26
 2019-01-27
 2019-01-28
 2019-01-29
 2019-01-30
 2019-01-31

[PHP] require和 include 載入檔案

兩個用法都一樣,就是require('file.php') or include('file.php')

require:

  • 主要用在載入核心程式
  • 載入檔案出錯時程式會執行中斷回報錯誤

include:

  • 建議用在顯示資訊像是 echo 之類用途
  • 出錯只會 Warning 警告,程式還是會繼續執行

require_once & include_once :

  • 系統會檢查是否已載入過,如果已載入就不會再載入
  • 因為多了檢查重複載入,所以跑起來相較於沒 _once 多點效能

所以主要差異就是在中斷這個動作,除非可以接受載入的程式出錯後繼續跑
不然請盡量使用 require 來保持程式的安全

[PHP]Ajax CORS 錯誤

有時在串接Ajax會看到下列錯誤

Access to XMLHttpRequest at 'https://url/test.php' from origin 'http://url' has been blocked by CORS policy: No 'Access-Control-Allow-Origin' header is present on the requested resource.

錯誤訊息主要是說ajax要連線的網址被瀏覽器的同源政策阻擋(CORS policy)
簡單來說就是ajax連線網址跟現在正在瀏覽網頁的網址不一樣
(就算是http跟https也視同不一樣)
所以ajax連線的程式就要設定Header開放跨網域連線


if($_SERVER['HTTP_ORIGIN'] == "http://URL_A") {
    header('Access-Control-Allow-Origin: http://URL_A');
}else if($_SERVER['HTTP_ORIGIN'] == "https://URL_A") {
    header('Access-Control-Allow-Origin: https://URL_A');
}else if($_SERVER['HTTP_ORIGIN'] == "http://URL_B") {
    header('Access-Control-Allow-Origin: http://URL_B');
}else {
	echo "no auth";
	exit;
}

如果要開放讓所有網域連線的話,設為 * 就可以了

header("Access-Control-Allow-Origin: *");

[PHP]取得用戶IP

主要有2個方式可以取得用戶的IP,分別為 getenv()$_SERVER
不過 getenv() 不支援 IIS 的 ISAPI

getenv():

function get_client_ip() { 
    $client_ip = '';
    if (getenv('HTTP_CLIENT_IP'))
        $client_ip = getenv('HTTP_CLIENT_IP');
    else if(getenv('HTTP_X_FORWARDED_FOR'))
        $client_ip = getenv('HTTP_X_FORWARDED_FOR');
    else if(getenv('HTTP_X_FORWARDED'))
        $client_ip = getenv('HTTP_X_FORWARDED');
    else if(getenv('HTTP_X_CLUSTER_CLIENT_IP'))
        $client_ip = getenv('HTTP_X_CLUSTER_CLIENT_IP');
    else if(getenv('HTTP_FORWARDED_FOR'))
        $client_ip = getenv('HTTP_FORWARDED_FOR');
    else if(getenv('HTTP_FORWARDED'))
       $client_ip = getenv('HTTP_FORWARDED');
    else if(getenv('REMOTE_ADDR'))
        $client_ip = getenv('REMOTE_ADDR');
    else if(getenv('HTTP_VIA'))
        $client_ip = getenv('HTTP_VIA');
    else
        $client_ip = '無法取得資訊';
    return $client_ip;
}

$_SERVER:

function get_client_ip() {
    $client_ip = '';
    if (isset($_SERVER['HTTP_CLIENT_IP']))
        $client_ip = $_SERVER['HTTP_CLIENT_IP'];
    else if(isset($_SERVER['HTTP_X_FORWARDED_FOR']))
        $client_ip = $_SERVER['HTTP_X_FORWARDED_FOR'];
    else if(isset($_SERVER['HTTP_X_FORWARDED']))
        $client_ip = $_SERVER['HTTP_X_FORWARDED'];
    else if(isset($_SERVER['HTTP_X_CLUSTER_CLIENT_IP']))
        $client_ip = $_SERVER['HTTP_X_CLUSTER_CLIENT_IP'];
    else if(isset($_SERVER['HTTP_FORWARDED_FOR']))
        $client_ip = $_SERVER['HTTP_FORWARDED_FOR'];
    else if(isset($_SERVER['HTTP_FORWARDED']))
        $client_ip = $_SERVER['HTTP_FORWARDED'];
    else if(isset($_SERVER['REMOTE_ADDR']))
        $client_ip = $_SERVER['REMOTE_ADDR'];
    else if(isset($_SERVER['HTTP_VIA']))
        $client_ip = $_SERVER['HTTP_VIA'];
    else
        $client_ip = '無法取得資訊';
    return $client_ip;
}

不同的狀況IP會出現在不同的地方
可以從這邊去測試從哪可以抓到IP:http://www.gocar.idv.tw/tools/whatismyip.php